Showing posts with label first aid. Show all posts

Thursday, 3 May 2012

MECEDCFAK

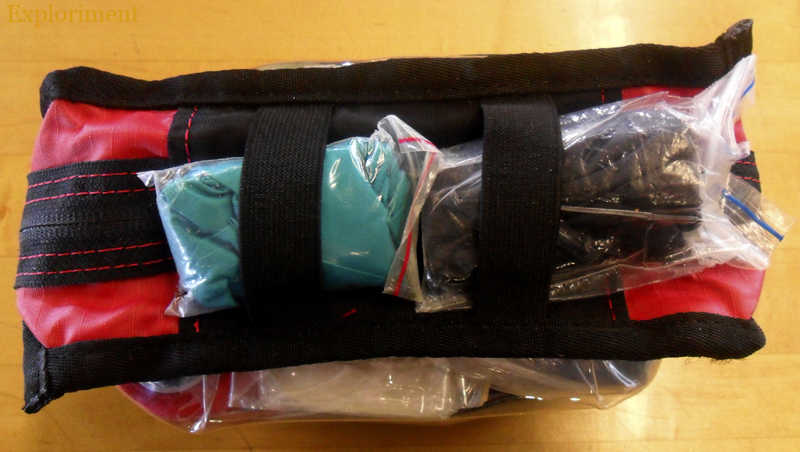
Lots of acronyms. Mountain Equipment Co-op, Every Day Carry, First Aid Kit. I wanted a slightly more substantial FAK in the Messenge’mups than just a boo boo kit. Dug this one out of the box o’ gear and filled it up.
The MEC first aid pouch comes in three sizes. The one I have is the small one. 22 cm (8½") x 13 cm (5") x 6 cm (2¼"). For the price you really can’t beat it. It’s not the pouch I would build, but it is a decent, serviceable pouch. It’s got a pair of belt loops so you can wear it on your belt. I replaced the zipper pulls with some spiral sinnets.
One side has a slot for a little organization.
2 pairs of nitrile gloves.
  1. Povidone Iodine Prep Pads
  2. Eye Dropper
  3. Laerdahl CPR Face Shield
  4. TransPore Tape
  5. 1" Gauze
  6. Finger Cots (4 sizes)
  7. Tubular Gauze Finger Dressings
  8. First Aid Guide
  9. Thermometer
  10. Benzalkonium Chloride Wipes
  11. Knuckle Bandages
  12. Fingertip Bandages
  13. Scalpels
  14. Sting Stop Wipes
  15. Ammonia Inhalant
  16. 2" x 4.5 Yards Gauze
  17. SteriStrips
  18. Povidone Iodine Ointment
  19. Eye Pad
  20. Blister Pads
  21. Finger & Toe Blister Pads
  22. Butterfly Bandages (various sizes)
  23. Vitamin A & D Ointment
  24. White Petroleum Jelly
  25. Biohazard Bag
  26. Triangular Bandage
  27. Laerdahl CPR Face Shield
  28. 4"x4" Gauze Pad
  29. Second Skin Moist Pads
  30. Mole Skin
  31. 2"x2" Gauze Sponges
  32. H&H 4.5" x 4.1 Yards Compressed Gauze
  33. Coban
  34. 1" Gauze
  35. 2" x 3" Gauze
  36. 2"x2" Gauze Sponges
  37. Burn Jel
  38. Cool Jel
  39. Double Antibiotic Ointment
  40. 3"x3" Gauze Sponges
  41. Pill Pack
And some larger, unlabelled photos if you want to get a closer look at anything.

Saturday, 29 January 2011

Tourniquet Holder 2

After one attempt to create a tourniquet holder, based on another design, and not being entirely happy with it, I decided to tackle another approach.
This time I used one solid piece of the plastic material I used previously (I didn’t care whether it flexed in the middle or not) and put channels on the bottom that I could route two separate pieces of shock cord through, and join in the center with a cord lock.
This approach makes it easier to get the tourniquet out I find, but my only concern with this approach is whether the cord lock might be too small and fiddly for someone to manipulate wearing gloves and possibly experiencing a loss of fine motor control due to an adrenaline dump.
On the bottom of the Emdom B.O.M.B.
On the front of the Emdom B.O.M.B.
I have a few other ideas for this I want to try out yet.

Tourniquet Holder 1

I had the idea to make some room inside a medium sized/second line first aid kit, like the Emdom B.O.M.B., by making a tourniquet holder to go on the outside of it. Not only that, putting it on the outside also makes it more easily accessible - an important thing for a tourniquet to be. There are some holders on the market - Mayflower RC’s Tourniquet Retainer, 215 Gear’s Tourniquet/GP Holder, and Blue Force Gear’s Tourniquet-NOW!. The latter is what I based this on.
Raw ingredients. Two pieces of plastic from an old back pack frame sheet, three pieces of elastic webbing, and two pieces of 1.5" webbing.
And the end result. The plastic pieces are end by end inside the 1.5" webbing, which allows it to flex in the center, making the extraction of the tourniquet easier.
Holding the C-A-T® Tourniquet.
On the bottom of the Emdom B.O.M.B.
On the front of the Emdom B.O.M.B.
As you can see, BFG’s is skinnier, but also different in that it only has two elastic loops. The center part goes under a PALS channel and the tabs on the end go under two other PALS channels.
The idea I had was to place it on the bottom of the Emdom B.O.M.B., and two PALS channels seemed logical, with a gap in between them. I thought of just one PALS channel in the middle, but I thought it would cause it to wobble around too much this way, since there wasn’t really a way to anchor the ends. BFG’s two elastic loops do a better job of holding the tourniquet in place. The two end elastic loops on mine seem not to hold as well. Maybe I made the elastic a smidgeon too long, maybe it’s just where it’s placed. And yet, getting the tourniquet free just seems way too snaggy and awkward with this set up.

That’s the dichotomy of something like this. You want it to hold the tourniquet securely in place so you don’t lose it, yet you want it to be easily accessible when you’re panicky. 

I decided to give it another try with a slightly different setup.

C-A-T® Tourniquet

I received one of these fantastic tourniquets recently (thanks Yeoman!) and it has caused a few projects to ensue. Figured I should start with just the tourniquet itself before I show anything else.
The C-A-T® consists of a 37.5" long, 2.5" wide, self-adherent, non stretchy Velcro band, with a friction adapter buckle, a windlass rod and a clip and strap that holds it in place. 

Its length makes it suitable for use over bulky clothing or on obese patients, and its width means more pressure to the extremity is applied over a greater surface area. 
The C-A-T® is straight forward to use – the Velcro band is wrapped around an arm or leg and the free-running end passed through the friction adaptor buckle. 

The windlass rod, which is connected to a free-moving internal band running through the centre of the Velcro band, (meaning it gives true circumferential pressure), is turned about three revolutions, or essentially until bright red bleeding has stopped. When the desired effect is achieved, the windlass rod can be locked in place with the clip, and secured with a small strap of Velcro over it. This maintains pressure when the casualty is evacuated. Even if the casualty is unconscious or the caretaker is otherwise occupied, pressure is maintained. 
Other tourniquets have relied on an ‘elastic-band’ or Velcro (like this earlier model I had) material being physically pulled tight to create the tourniquet effect. The C-A-T® can be used one handed, if that is what’s necessary. In other words, the casualty can apply it himself, and do so much more easily than many older models of tourniquet would have allowed. 
Packaged size is 6.5" L x 2.4" W x 1.5" D , 37.5" when opened up, and it weighs 2.7 oz. The National Stocking Number is NSN6515-01-521-7976. 

The Journal of Trauma (February 2008) calls it the best prehospital tourniquet. Recommended by the Committee on Tactical Combat Casualty Care. U.S. Army’s Institute of Surgical Research has proven that it’s 100% effective in occluding blood flow in both upper & lower extremities. Official tourniquet of the U.S. Army, which also awarded it one of the “Top 10 Greatest Inventions”.
Things that have changed on the C-A-T® since this model is that the windlass rod is twice as strong as before with an increased diameter and improved grip. The windlass clip has been reinforced and the Velcro security tab is now white making it easier to distinguish and includes a writeable area to record the time of application. The tip is now read making it easier to see and thread during application especially in low light conditions. (It’s called quite grandiosely “Red Tip Technology™” which strikes me as a bit over the top. I’ll concede it is a smart feature, but a “technology”?)  
 There is also an orange model now. (I figured that the US military had enough buying power that it would be available in foliage green or coyote brown by now, but black and now orange are the only choices.)

All in all, cool piece of med gear. I (fortunately) have a relatively low risk of ever needing to use this, but never say never. I think someone working in an industry that has any sort of risk of someone losing a hand or an arm (machine shop, printing), as gruesome as it sounds, might want to consider investing in one of these. Take all the safety precautions you want, but it does happen.( The statistics on limb loss are pretty astonishing. 77% of amputations are because of trauma. 5.86 per 100,000 persons lose a limb secondary to trauma. In 1996 there were 1,285,000 persons in the U.S. living with limb loss. 50,000 new amputations every year. 25,000 of those lose an arm.) As much as it would suck to lose a hand or part of an arm, bleeding out because of it would suck even more.