They’re all okay, but none of them were entirely right for me. The TT FR, was a good size, had a waist belt, variety of mounting options, a secure slot for shears, zippered pocket for gloves, orange on the bottom interior, but I wasn’t keen on the one size fits all elastic loops and the looking down into a bag with vertical storage orientation. The medium sized pouches are sized and set up predominantly as “blow-out kits” ie, to treat massive trauma, ie gun shot wounds. Usually this means members of the military or the police. I don’t really face the same threats they do and I always wanted to add stuff that was more germane to the activities that I engage in. While I spend time around hunters and firing ranges, so someone getting shot isn’t an impossibility, for the most part I usually contend with scrapes, cuts, sprains, blisters, burns, rashes, soreness, belly ache. Pretty low on the panic scale stuff. Blow out kits are fine when the items carried in them are very standardized by protocols, the users train with them, etc. My needs are a bit different, and consequently I found the way they were organized not to my liking. What I had didn’t really fit well in it and it consequently became a pretty bloated item.
The other thing that I think is important to carry is a SAM Splint. Now I know some will say to just use two sticks, and I guess if it was a worst case scenario, sure, but come on, they really are a sad substitute for a SAM Splint. Rolled up it’s a pretty hefty size, and folded up it would still take up a lot of room in one of the medium sized kits I had. Stuff would spill out at that point.
On canoes trips and such, I’m generally the more experienced first aid guy. I expect everyone to have a first aid kit on them, but not everyone needs to be prepared for a calamity. As long as everyone has the basics covered, I don’t mind bringing some of the more specialized stuff.
Another consideration for me is that I’m now at a point in my life that I have kids around me. Kids, due to a lack of experience, awareness, etc. are way more prone to injuries. They do things that adults know not to do, and consequently they’re magnets for cuts, scrapes, bumps, rashes, sprains, etc., etc. Since we’re now at the stage where they’re coming with us on canoes trips and hikes, I really need to be prepared for any eventualities. Dear gawd, I’m turning into a responsible adult.
So, I set out to make a kit that suited me to a T.
I’ve shown the EscapePod™ and the Slurp’mups™. I also wanted to have a first aid kit component to go with it, one that could mount on the outside of my main pack, be easy to get at, and detach easily when I needed to head away from the main pack. I wanted it to be large enough to carry all the things I thought necessary, and address another area I found lacking - the organization inside of it.
I put on my thinking cap and came up with a solution that would allow for endless organization to suit the individual end user.
All right enough talking from me. Let’s have a look.
Front. Three straps with six buckles serve to attach it to the pack. The size is 40.6 cm (16") high by 15.25 cm (6") wide by 12.7 cm (5") deep.
Side. The pouch is a clam shell, that opens with a zipper.
Side.
Back.
On the back is a holder for a pair of crash shears. I opted to put them on the outside since I access this thing a lot. I have a nice multi tool, and a nice knife, but the funny thing is that this gets used for a lot of cutting tasks.
At the bottom of the back I put two strips of elastic, one 2" and one 3" to form a pocket to hold a pair or two of nitrile gloves. When I unclip the Ouch’mups to open it up, the gloves will be among the first things I want to access, so opted to put them on the outside so they’re right there.
I also put a grab handle on the back so that I can detach it and take it right to an injured person if need be.
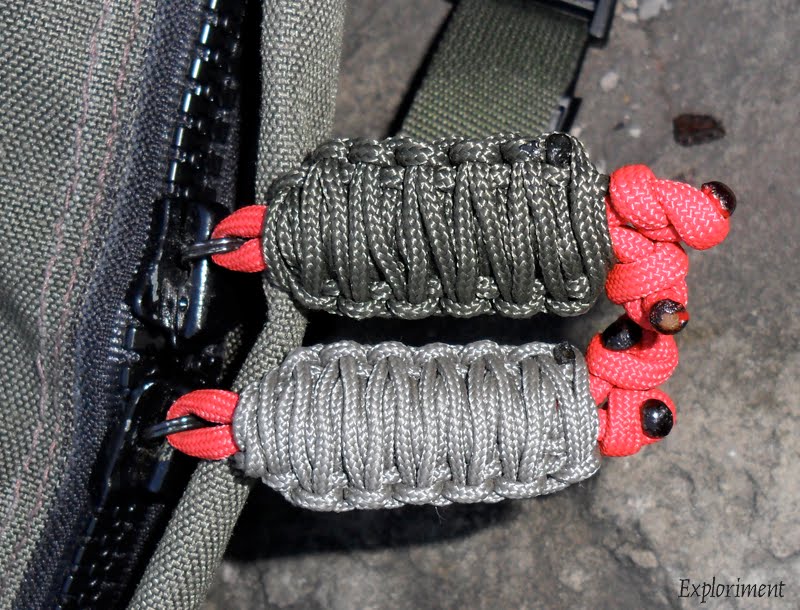
And of course some groovy zipper pulls. I thought I’d do a red core to help distinguish it as a medical kit. I made about my 19th attempt at a knife lanyard knot, but damn it’s a tricky one to master. So I just did two figure 8 knots at the bottom, and then just covered them in a cobra sinnet. Did two different shades to help distinguish if the zipper is closed or not.
Okay, now let’s turn this thing inside out.


A lot of first aid kits use elastic loops to hold small items. A lot of the blow out kits I mentioned, the items carried inside them are very standardized by protocol. There’s a spot for all those specific items. Some kits have a bunch of elastic loops, and whoever made it hopes that will suffice for the user. It rarely does. Trying to decide on a set up of pockets or loops to suit me, ends being a complete nightmare to figure out. What might seem like a good idea might not be so great in the end, so then what do you do. And again, everyone is different, and what might be great for me and my needs, may not work for someone else. I also run into the problem that I have stuff in there that is a few years old, and that when I use it up, it may no longer be available, something better has come along, or my skills sets increase, what I thought was vital 20 years ago proves to be a non issue, etc. Another problem I have with sewn in elastic loops, is that a lot of elastic gives up the ghost after a certain period of time. Replacing it isn’t so easy. It might be the best kind and actually be good. But I’ve been burned before. To me it is the weak link in the chain.

So here is the idea I came up with to allow me to set it up just how I wanted. I took 550 cord with the cores taken out and sewed them on every 1". I call it Cord Lattice Attachment System Pattern (CLASP). (Yes, the lines are little wonky, but they’re close enough.) I will then use bungee cord to hold everything in place.

On the other side, I put two slots, divided into 4 pockets, to put some large flat items.
In the centre is a divider to house the SAM Splint.
I thought my measurements were okay, but it ended being a pretty tight fit. Still works fine though.
So, there it is. Now it’s time to fill it up.
Now this is likely not the final set up. Some little tweaks might still be made, some items have to be added, but it gives you a pretty good idea of how it’ll all work.
The aspect that I’m really pleased about with this set-up is that everything is easily seen and easily retrieved. Some of the other set-ups I’ve had would have necessitated pretty much unpacking many things to get at one item. If I do ever have to face a holy shit! scenario, I can easily get whatever I need.
Okay, quick run down of what I have in there. (Any questions, concerns, suggestions – I’m all ears.)
The little red circle is a tin of Tiger Balm, the yellow container is the Pill Box, two packets of H&H Compressed Gauze, two different kinds of nitrile gloves (the blue ones are heavy duty), and of course TransPor tape (what probably gets used the most).
The gloves, the tape, a tube of Vaseline, underneath that is an eye kit, a rolled up bio-hazard bag, a thermometer, an irrigation syringe, and a tube containing a bottle of Tea Tree Oil (love that stuff).
One side of the divider has all the little packets of salves and the like. Sting stop, Benzalkonium Chloride wipes, benzoin tincture, antiseptic wipes, etc.
The other side of the panel deals mainly with extremity injuries. In my own experience, cuts, scrapes, breaks, burns, etc, seem to happen on the hands and fingers, and to the feet (blisters, stubbed toes) the most often. A bunch of blister dressings, some specialized finger bandages, and some fun bandages for the kids (animals, superheroes, etc.), SAM finger splints, Laerdal face mask (would like to put the Laerdal pocket mask in there, but there isn’t the room), finger bandages, finger cots, compressed triangular bandage.
The top of the Ouch’mups has trauma stuff. Tensor bandage (not really trauma, but the best place for it), Israeli Bandage, tourniquet (there’s better, but it’s what I have for now), roll of Coban with a roll of Kerlix inside of it, another roll of gauze, several packets of 3"x3" gauze, and an abdominal pad under that.
So under that stuff are four slot pockets.
Another has a bunch of 4"x4" gauze dressings.
And this pair of Sliver Grippers, is actually one of the more useful things in my FAK.
And there she is. Little fuller than I had predicted, but it works fine, it closes nicely. It really is damn hard to gauge the exact thickness it will end up being. It’s not an easy assortment of items to try and keep in a semblance of shape. I did my best to measure it, but I probably should have made it a ½", ¾" higher. Oh well. It works. Very well so far.
And of course the badges. Red cross to let everyone else know where the first aid kit is, and not that it matters one iota, but letting the world know my blood type, and that so far nothing has caused me grief.
Oh yeah, the bungee cord. Some of it I sewed shut, but sewing through that is a pain. I ended up just tying a square knot in all of it. I may get some thinner bungee cord as well. And I suspect, just a smidgeon, that this may end up getting tweaked, just a tiny bit here and there. So it’ll get some switching around as I figure it all out. But the important part is that if it fails, I can easily replace it. Unlike sewn in elastic.
This is very new, but I think everything is easy to get out, and if it’s an emergency, and it really has to come out, I’ll just cut it. I can replace it.
Now another idea I implemented was that when I have this clipped to any pack, to get at it and unzip it, I have to unclip the three SRBs.
Easy enough to do, but doing so...
...causes the pouch to fall on its face. Great when I want to get at the shears, or yank out a pair of gloves, but makes getting at everything else a pain.
So underneath the handle is an SRB to hook into the pack, so that when it opens, the trauma part is down and everything else is easy to see and get at. I can also disconnect it at the back, and then put it on the face of the pack and buckle it in.
So here are the three components together: the EscapePod™, the Slurp’mups™, and now the Ouch’mups.
This gives me everything I would need: basic shelter, insulation, boil and cook, some food, some cord, first aid gear and water. Wears very nicely fully loaded, and while the Ouch’mups is deeper, the weight of the side pockets is about the same.
Here it is worn on the side of the EscapePod™.
Oh and I almost forgot, a big part of the inspiration for this was Thommo (and Gany’s) excellent Super Size Long Pocket FAK. Aspects of it were right on, and others didn’t suit me. So, I ran with the idea, and verged off into creating something just for me and my circumstances.
Oh yeah, wait for it... the whole thing was sewn by hand. :-)




 Posts
Posts


