Wednesday, 30 June 2010
Hitchcraft – Paracord Bracelet
Made this a while back. Using some black 550, and a fatsex buckle, and weaving it with a king cobra knot, I made a bracelet. I find the weave with 550 is a bit too thick and bulky though. I like the effect I get from thinner cord a lot more. Next time I orders something from Supply Captain, I’ll get some black accessory cord and try making one from that. I also want to try making one that has no buckle, but is woven as one continuous circle.


Monday, 28 June 2010
Sosoetry – Miss Hissy Fit Kitty
My friends had a cat that for a really long time absolutely hated me. No rhyme or reason as to why. This was kind of distressing to me, since I really like cats (and dogs and other critters) She had nothing to fear from me, and I never once gave her a reason to dislike me. But, illogically, she kept hissing at me, and taking the odd swipe at me if I tried to pet her. Sometimes she would be okay with me touching her and purr for a few minutes as I petted her. Then it would dawn on her that it was me, her mortal enemy, and she would freak out. *sigh* It took years and years, but towards the end of her life, I guess something started to work in that strange little brain of hers, and she mellowed out. Maybe a near decade of me not hurting her at all, was the proof she needed that I really was a nice guy. She would come and rub against me and sit in front of me and let herself be petted, and actually sit and tap me on the arm if I ignored her. Messed up cat, but I’m glad she made peace with me in the end.
The bits in quotation marks are meant to be read in kind of a slinky seductress voice, and the bits below it in kind of a “dipstick who is completely befuddled by the illogical vagaries of women” voice. (which, let’s be honest, pretty much describes most males on the planet.)
Kali the Krazy Killer Kitty
“Oh yeah baby, smother me in kisses”
then I’m rewarded with a chorus of hisses
Kali the Krazy Killer Kitty
“Oh yeah baby, smother me in kisses”
then I’m rewarded with a chorus of hisses
“oh yeah baby, you treat me right”
then suddenly you jump with fright
then suddenly you jump with fright
“oh yeah baby, I like the way you rub me”
then you show your ass and snub me
then you show your ass and snub me
“oh yeah baby, pet me right there”
then react like a demon from a nightmare
then react like a demon from a nightmare
“oh yeah baby, you know just how to love me”
then all other times you rebuff me
then all other times you rebuff me
“oh yeah baby, I’m a loveable girlie”
then how come you’re always so surly
then how come you’re always so surly
“oh yeah baby, rowwrrr, make me purr”
then you respond like a snake with fur
then you respond like a snake with fur
“oh really baby, I’m an adorable kitten”
no, you’re satanic and venom spittin’
no, you’re satanic and venom spittin’
“oh come on baby, give it another try”
why, you’ll just give me the evil eye
why, you’ll just give me the evil eye
“oh honest baby, I mean you no harm”
sure, you’ll just slash at my arm
sure, you’ll just slash at my arm
“oh please baby, I just need to be cuddled”
nah go away, your brain is all muddled

nah go away, your brain is all muddled

Sunday, 27 June 2010
S.o.t.D. – Sara – Fleetwood Mac
I have very little patience for “classic rock.” To be perfectly blunt about it, “classic rock radio” makes the bile rise in my throat. Oh, I like lots of the music just fine. But it’s the fact that there must be 7 oceans worth of music out there to be discovered, and they have played the same parking lot puddle worth of music over and over and over for thirty, forty years. And that people are perfectly content to listen to Baba O’Reilly and Satisfaction and Takin’ Care of Business and Born To Be Wild day in and day out. Frankly I think it’s pathetic.
Saturday, 26 June 2010
S.o.t.D. – Forbidden Colours – D. Sylvian & R. Sakamoto
Theme song to Merry Christmas Mr. Lawrence. There is also a solo piano version by Sakamoto. Mark Stewart also did a version of this which I think I like more than all the others.
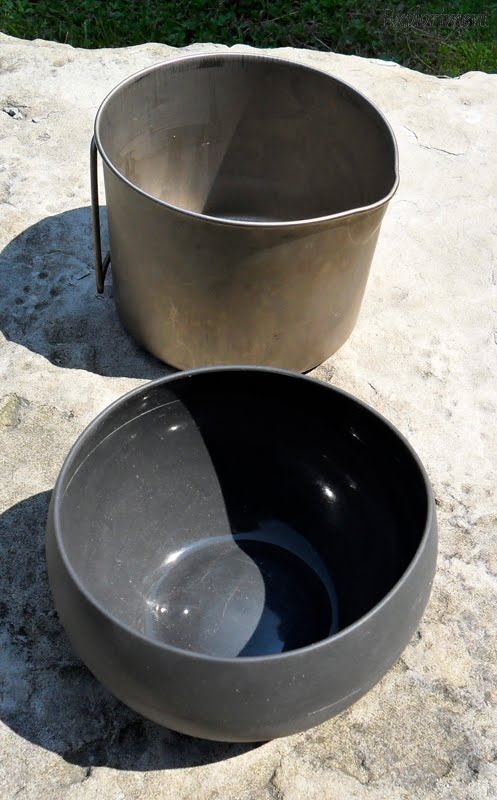
MSR Titan Kettle
I wish there was a way to deduce the ultimate gear set up just from looking at a picture in a catalogue, buy it and be done with it. Alas, it often takes some trial and error to get the perfect setup dialed in.

 I’ve been the very happy owner of an MSR Titan Kettle for a few years now. Of all vessels I have to boil or cook in, it’s by far my favourite. The handles don’t flap around or clang, the lid stays on securely, there is a pour spout, the handle on the lid can lie flat for storage but be secured upright when in use to make removing it easier, the size is just right for one or maybe two people, there is a tiny hole in the lid to serve as a whistle to let you know the water has boiled (I could do without that feature personally), it’s made out of titanium, which is always cool.


About the only thing that I made specifically for this was a wind screen.


 I played around with a few different stoves. (I have dozens to choose from.) Due to it’s small size, I had to try the Gram Weenie Stove. (The instructions to make it if you’re crafty. The place to buy it if you’re not.)
 Great little stove – light, small, efficient – but its small size makes it suitable more for a very narrow pot like the Snow Peak Mini Solo. With a slightly wider pot like the Titan Kettle, it’s a bit too wobbly for my liking.

 As I mentioned I have made loads of alcohol stoves. One of the ones I like the most, and was absolutely the easiest to make was the (what is alternately known as a) FancyFeast or SuperCat. It takes up a bit more room in the kettle, but I think this is the one I will go with.
Both of these stoves serve as their own pot rests, due to the jets being on the sides of the stove. A stove design that has the jets on the top requires a separate pot stand of some sort. Not a big deal, but I thought I would like to try and avoid that as it just means more stuff in the kettle.
 Some stoves require measuring, cutting, sawing, drilling, shaping, gluing, riveting, etc. This one can be made by an all thumbs on two left hands klutz. A cat food can and a hole punch is all that is required. And it works really well.


 ...center the pot on top of the stove...
 ....and put the lid on. Or you can put the lid on the pot, make sure it’s square on the stove and drop the wind screen around it. :-) The lid clicks on to the pot fairly securely. Since all I ever really do with this is boil water, that’s fine with me. If someone were to actually cook something in there, and need to stir often, they might want to just rest the lid on top like I did in the photo.
Oh and a hint about titanium pots. Make sure you put the water in before you put it on the flame, otherwise you’ll get a crazy anodized pattern in the bottom of it. Ask me how I know.
I tried various approaches to what could all be fit inside the kettle, and one of the things that fits fairly well is a Guyot Designs Squishy Bowl.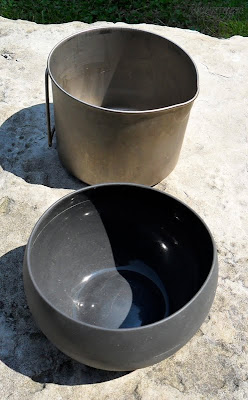

 This is what the set up is now.
 A bandana to grab the handles with, wipe the kettle after use, etc., etc. A big part of what it does though is stop everything inside from rattling around.
 A Fold-A-Cup, which you can see in more detail here.
 Bic lighter, two fuel bottles, stove, primer tray. (Here you can really see what putting an empty pot on a flame does to the titanium. Whoops.)
 Spent quite a bit of time trying to figure out what bottle would serve best to hold the alcohol. Found that Purell hand sanitizer bottles were the right height (or length once you lay them on their side) to fit in the kettle, and the fact that they’re rectangular-ish makes them more packable. This is enough fuel for two days. Now I just need to put some of these warning labels on them.
I suspect I might do a bit of tweaking to it yet, maybe cut down a spoon to fit in there, but by and large it’s how I want it. I wish I could have a bigger cup, but what I have will suffice. It’s going to take a bit of testing over time to see how durable those printing plate wind screens are. Maybe they’ll be just fine, and maybe I’ll have to swap them out with screens made from something else.
This makes for a nicely compact cooking system. Certainly as compared to the Caldera Cone or BushBuddy. I like each of those systems and they each have their place, and serve a niche. The Caldera Cone I will likely keep for canoe trips or trips in a vehicle where weight and room aren’t as much of an issue, and the BushBuddy is great for cold temperatures or extended duration trips. But for a lot of what I do, which is day trips to three day hikes and hang’mups, where I want to keep my pack size and weight down, this is a pretty ideal set up.
The other thing that’s great about this set up is that it fits perfectly inside the Camozy.


 Since it all works in conjunction anyway, it makes sense to keep it all together.
Oh and the weight of the whole set up as you see it there, with the cozy, is 430 grams.
Cooking setups being a case in point.
I’ve made a whole bunch of alcohol and wood burning stoves, wind screens, pot stands, I’ve tried a few different multi-fuel and canister stoves, a variety of pots, etc. I have a BushBuddy, and a Caldera Cone. They all have their good points, they all service a niche, but alas they also all have their own drawbacks.
Besides striving to reduce the weight of what I’m lugging about, I also want to reduce the size of what goes in my pack.


I decided to put together a cook set that was completely contained within the Titan Kettle.

Now this was my first stab at it.
About the only thing that I made specifically for this was a wind screen.

I needed one that would fit perfectly within the kettle, so I utilized a printing plate. I’ve used many things to make wind screens. A disposable aluminum baking tray liner is very easy to work (scissors and a hole punch will work), but probably won’t survive for a really long time. I’ve also used tooling foil. Easy to work and has held up very well. Some people use roofing flash, which is very sturdy, but heavy and more difficult to cut and drill. Here I decided to experiment with printing plates. Flexible, yet a bit stiffer than some other stuff I’ve used and still easy to work. And for me, they’re easy to acquire and free.
 I decided to try one without the usually recommended air holes at the bottom. Just for the heck of it. If it didn’t work, it’s not a big deal to add some holes. I made two others at the same time with two different vent hole arrangements. I’m not sure how well printing plates will hold up long term. The look of the discoloration I’m fine with. But after a quick trial session they felt a bit weakened in the discoloured areas. I don’t know if the chemicals the plates are coated with have anything to do with it. But that’s all part of the experiment. Try things out, see what works, see what doesn’t. Gives me an excuse to get out for a hike. Not that I really need one.


I cut all three wind screens to the length that I did so that I could either close it around the opened handles...


...or with the handles folded in.


Both of these stoves serve as their own pot rests, due to the jets being on the sides of the stove. A stove design that has the jets on the top requires a separate pot stand of some sort. Not a big deal, but I thought I would like to try and avoid that as it just means more stuff in the kettle.


Add alcohol to the stove (you become very good after a while at knowing exactly how much is required for boiling given amounts of water), put a little bit in the primer pan under the stove, light it and in a moment the alcohol in the stove lights.

The weird thing about alcohol is that in daylight it’s not easy to tell if it’s burning or not. The flames are invisible. Most often it does light, but there are times when it doesn’t. Today I could see vapours on the rock, and sometimes you can see bubbles form and pop in the alcohol, or hear a slight hissing sound. I usually do a quick pass a few inches over the stove with a finger to feel the heat.

Center the windscreen around the stove...


Oh and a hint about titanium pots. Make sure you put the water in before you put it on the flame, otherwise you’ll get a crazy anodized pattern in the bottom of it. Ask me how I know.
I tried various approaches to what could all be fit inside the kettle, and one of the things that fits fairly well is a Guyot Designs Squishy Bowl.

Unfortunately it made getting everything else I needed to get in there very tough. Bummer, since its size made it a pretty versatile item.


I suspect I might do a bit of tweaking to it yet, maybe cut down a spoon to fit in there, but by and large it’s how I want it. I wish I could have a bigger cup, but what I have will suffice. It’s going to take a bit of testing over time to see how durable those printing plate wind screens are. Maybe they’ll be just fine, and maybe I’ll have to swap them out with screens made from something else.
This makes for a nicely compact cooking system. Certainly as compared to the Caldera Cone or BushBuddy. I like each of those systems and they each have their place, and serve a niche. The Caldera Cone I will likely keep for canoe trips or trips in a vehicle where weight and room aren’t as much of an issue, and the BushBuddy is great for cold temperatures or extended duration trips. But for a lot of what I do, which is day trips to three day hikes and hang’mups, where I want to keep my pack size and weight down, this is a pretty ideal set up.
The other thing that’s great about this set up is that it fits perfectly inside the Camozy.


Oh and the weight of the whole set up as you see it there, with the cozy, is 430 grams.
Friday, 25 June 2010
S.o.t.D. – Biota – Sync24
Reminds me a bit of Biosphere. Given that this fella is from Sweden, it’s perhaps not surprising that this has a bit of a winter landscape feel to it. Ominous and foreboding and yet there is something very beautiful about it.
Thursday, 24 June 2010
Wednesday, 23 June 2010

Type Design – Carfrae
Typeface done very quickly for use in a logo, made from an element of another logo. I culled the C from another logo (can’t for the life of me remember what the logo was though) and made the whole typeface from it. And then of course this wasn’t ever used for the logo. Good thing I didn’t spend more than a couple of hours on it. Nothing spectacular, but it’s something unique. A couple of the letters work better than others, and I have used it a few times for other things though.
Wood Swiss Army Knife Scales
I’m a fan of Swiss Army Knives.

While I have a Leatherman Wave that I love and use every day, I still carry a SAK as well. I got my first one when I was about six, inherited from my grandfather. Much to my regret, I lost it at some point when I was a teenager. I acquired another one, a Victorinox Huntsman, about 25 years ago, and a few others over the years, including a Victorinox Climber.
While placing an order with Tom (RotoKid at SOSAK Online) for some paracord and other odds and ends, I decided to order some wooden scales, Thuya Burl to be precise, to jazz up the Climber. (Terrific guy to deal with incidentally. Also, his dad Tim (FelineVet at SOSAK Online) is worth considering if you want to buy a Swiss Army Knife. All the SAKs that he sells fund his Feline Veterinary Emergency Assistance Program, a charity to help people pay for emergency procedures for their cats that they might not otherwise be able to afford.)
First step was to pop the original Cellidor scales off.


And this is what it looks like under the surface.

There are three brass pegs on each side that the scales pop on to.

The way I figured out where to drill the holes in the wooden scales was rather low tech. I put them where they needed to be and pressed against them, leaving an imprint in the wood.

These marks were then circled with a pen...

...clamped in place...

...and then drilled out.

The holes ended up a little wider and a smidgen deeper than they really needed to be, but whatever. I also contemplated carving out grooves for the tweezers, toothpick and possibly a pen, but quickly gave up on that as the pain in the ass factor would be far too high.

The epoxy would take care of that.

Slather it on the inside of the scales, filling the holes.


Did my best to remove any epoxy that had oozed out and then clamped and rubber banded the scales down.


The next day I set to the scales with sandpaper, removing any excess epoxy, making them flush with the edges and rounding the scales.


I still have some fine tuning to do here and there, some more sanding in spots, and then oil the wood, weave a fob for it, and I will have a very personal SAK.


Subscribe to:
Posts (Atom)


