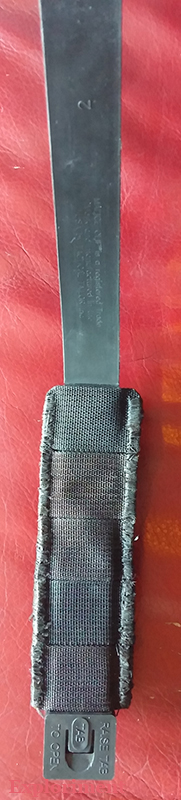
I have to admit with some chagrin, the first instance of my sewing failing. Walking along, and .... my bag is on the ground. 2½ years ago, one of the 2 buckles (the prongs on the male part) connecting the shoulder strap to the Messenge’mupsbroke. Three years of anywhere between 5 to 30 pound loads hanging from those delrin side release buckles - for easily many thousands of hours - that was its limit revealed. (The breakage hierarchy is hardware, thread, webbing and then fabric.) Since the 2" webbing was sewn right along the entire length of the back, right into the seams, my only option for repair was to hacksaw off the buckle, take a piece of 2" webbing, another buckle and sew it to the existent webbing. Easy. Took my usual approach, a needle and thread and fixed it. Meant to bartack it, but it was put off for so many more pressing, and let’s face it, fun projects. So, 2½ years of once again, thousands of hours of heavy - way too heavy - loads, and the standard 69# thread gave out. Buckle’s fine. Thread broke. I've been trying really hard for many years to destroy what I make. I like it and all, but I have to see what it can withstand. And this is without doubt the most strained part of anything I’ve made. The way I do stuff is maybe a bit weird, but I’m still fairly confident in the results. Good thing I have more than one bag to use till I fix this.
After carrying around the Tap’mups (Mk. 1) for about ¾ of a year, I noticed the plastic sleeve was starting to crack.
More disturbingly, the bottom was cracking to the point where I feared the cards would fall out.
But before I could even make a trip to Toronto to buy a replacement pouch, something worse happened.
One afternoon after work, getting on the bus, I noticed that the card pouch was loose in my hand. Given that I made that particular version of the Swipe’mups in 2007, and carried it for quite a long time, I’m a bit surprised it lasted this long before the thread broke.
I went on a trip to Lee Vally with the idea I would buy one of these. I stopped into a Staples next door and found a (possibly ?) better solution. Certainly cheaper than the retractable lanyard at LV, and (possibly) a trip to Toronto to get a replacement pouch would have been. A Merangue Silicone ID Badge Holder and Klip-N-Pull Retractable Keycard Badge Holder.
Unscrewed the belt clip off the back of the “Klip-N-Pull Retractable Keycard Badge Holder”.
Now on to making a pouch for it. Tubular webbing wouldn’t work this time, as it was too wide to fit. Just took some 2" webbing and folded and sewed it to form a pocket and belt loop.
The one notable thing I did was to put tabs along the sides that I could put some bunjee cord through. I didn’t like how the card hung down. Wanting to avoid it catching on things, I added this feature so I could put it out of the way when needed.
After using it for a while, I noticed that the cards had a tendency to pop out from behind the clear plastic cover.
You can see here that the card itself isn’t much bigger than the slot it sits behind.
Made a pouch from some 20 mil marine vinyl, which so far, has done a great job of keeping the cards contained within the silicone pouch. The Presto card doesn’t show at all, but it really doesn’t need to. Only the library card needs to have the bar code scanned. (And a quick update on this. About three weeks after completing this, I was about to get on the bus, felt around, felt around some more, looked - the stainless steel wire, which I figured would be way more durable than the cord of the previous retractable lanyard, had broken. Library card and Presto pass – gone. I should have checked the reviews, because everyone seems to have the same experience – give it a few weeks and the wire breaks. Worthless piece of shit. Do not trust this. Your keys, cards, etc. are too valuable. And Staples hasn’t posted my bad review of it more than a month after submitting it. Maybe they have a limit on how many bad reviews they’ll post. Lame.)
Just what the world has been clamouring for! The world’s first tactical thread snip holster! For rapid deployment of cord cutting tools on covert black cloth missions!
Okay, in all seriousness, I picked up these (quite nice) thread snips at the terrific Lee Valley.
I use them a lot for work, and wanted some way to carry them on my belt. So, naturally, I made something for that very purpose.
The snips open by squeezing the sides together. I removed the wire loop at the end of the sheath, put some cord through and attached them to the holster that way. Piece of 1" webbing forms the bottom, a piece of 2" webbing forms the front, and a piece of 1½" forms the back. Sewed 1" webbing on for the PALS, put a malice clip through, and voila. It’s not pretty, but it serves its purpose perfectly.
There was a Contigo bottle a client had left at the shop, languishing in the basement for well over a year. My Sigg bottle cracked and leaked, and I needed a new bottle. I kindly adopted this poor, abandoned one. But I needed a way to carry it. So, naturally I made one.
Fairly straightforward. Took some 3" webbing I had, sewed a 2" strip down the front and another one down the inside back, PALS webbing along the back, a Duraflex Spring Release Buckle on the front, a 1" strap on the top, a cord lock at the bottom on the back and then threaded bungee cord through the whole thing.
I put a piece of 1" edge tape across the buckle to prevent it from flopping around, and to make it easier to reseat the male end of the buckle back into the female end of the buckle.
I’ve been using a lacklustre toiletry bag for my sewing kit for about 15 years. I guess it sort of did the trick, but it was lacking in many ways. I often thought that I should gut the interior and rebuild it. But it always ended up on the back burner. I jokingly figured I would finish all the other things I wanted to make, finally tackle it ... and then never make anything else. Figured I would make much more in the years to come and that I owed it to myself to come up with something that really worked.
The Sew’mups.
Let’s get the most important feature out of the way first: the all important velcro patch panel. Size wise, it’s 24 cm (9½") high, 16.5 cm (6½") wide, and 7.5 cm (3") deep.
The back features PALS webbing. Partly for attaching to packs and bags, but also to serve as a slot to house a pair of scissors and forceps. The latter both for pulling a needle, but also to serve as a fid and end grabber for doing paracord work. It can also serve as a precision clamp.
This top view shows the fur coat closure system I use to prevent the two tools from falling out. (They’re called “fur clips” {pelzhaken in German}. Prym makes it, and the product code for it in black is 416502, although it is also available in brown and beige.) The ring was sewn between the two ends of the ½" webbing, and the metal clasp was sewn to the top of the pouch. I’ve done it on a few medical pouches and it works very nicely.
And a close up of the lanyard knots I used for the zipper pulls.
The two sides. I used a #10 zipper, which is probably over kill, but I had this and didn’t feel like making a trip just to get a smaller zipper. (And you’ll see white positioning marks everywhere. They’ll fade in time.)
Bottom. It’s not actually that lumpy and misshapen. Okay, the outside is a pretty straightforward rectangular pouch. Let’s get on to the juicy bits, the interior.
I wanted to be able to open it right up and lay it flat. Yet, if I had it attached to a bag or pack, it could fall open and nothing would fall out.
The front panel features CLASP (Cord Lattice Attachment System Pattern), paracord with the cores taken out and sewn in a matrix. I can attach bunjee cord to this to hold spools of thread (Coats Upholstery for the most part) and film canisters with (rarely used) safety pins, and (often used) rubber thimbles. Also put a Filzer I‑Beam X‑90 flashlight in there.
In the bottom I attached these ITW-Nexus PipeDoc Sternum Sliders. And I used them in a completely different way than they were ever intended to be used.
How I intend to use them is as a spindle for a spool of thread. A piece of paracord with a button knot in one end as a stopper. The bunjee is fine for storing thread, but for the thread that I’m using for a given project, and will use for a while usually, I wanted to have easier access to.
Paracord goes through the spool, slide the paracord through the piping holder and finish it off with a figure 8 to serve as a stopper knot on the other end. Works very nicely so far.
Behind this is a slot to house a sketchbook. I use it for sketching ideas, visually solving problems, scribbling down measurements and calculations, etc.
The back panel. Trying to figure out slots to house all the myriad of tools is a pain in the butt. Not to mention, I might use different tools sometimes for different tasks, purchase different tools that are a different size, etc. So what I came up with in the Exploriment Laboratories is an exciting new modular attachment system known as VREE – Velcro Repositionable Exchangeable Equipment. (My 4th modular attachment system for anyone keeping count, after Thomas’ Attachable Bag System, Belt Attachment Lowerable Loop System and Cord Lattice Attachment System Pattern.)
Each tool has a pocket made of hook Velcro on the back, and loop Velcro on the front. This way I can position them where I like, remove them, stack them on top of each other, etc.
A closeup of one of the pouches. Not at all fancy. I’ve been adding a piece of webbing and a bit of velcro on it to help hold the contents in place.
I still intend to make a few more pockets, but to give you an idea: Top row: Olfa retractable knife, Dritz measuring gauge, 6" metal ruler, and needles in the loop Velcro with a piece of loop Velcro over that to hold them in place. (One of the things I still have to make are some pockets for pencil lead holders that I use to hold needles. But these are the ones I use most frequently, so I thought it made sense to have them be easily accessible.), and while it’s folded out of the way in this picture, you can see it in the one above, a Victorinox Classic. Bottom row: extra blades for the Olfa knife, A Staedtler Mars Technico drafting pencil – I like these partly because the plunger contains a semi-decent sharpener (will get a second one for which I’m trying to find white lead), Victorinox SwissCard scissors, a measuring tape, bic lighter, candle in a tin, and a white Sakura GellyRoll marker.
Closeup of the holder for the measuring tape.
A tea light I pressed into a small tin. If I have to singe the ends of a lot of webbing or material or cord, I prefer to do it with a candle. Keep a lighter lit for a long time and it quickly gets hot enough to burn your thumb. Plus it’s a waste of the fuel. I have loads of tea light candles I’d prefer to use up before I use up disposable lighters or butane.
Closeup of the needles in the loop Velcro.
Let me just put this picture up again to show another feature, the Bulldog Tails. I use binder clips a lot. I used to store them in M&M tubes. When I work on something, as I sew an area, I start removing the bulldog clips. Rather than put them back in the tubes, I would just toss them in the bag, or clip them to things. Not a great solution. This way I can store them, have easy access both to getting them and also putting them back. Plus it’s just more streamlined than the tubes. I can flip them out of the way to get at the tools underneath.
To prevent them flipping and flapping too much, I put clips on the bottom of them, which attach to a loop of paracord.
And in a slot pocket behind I have a cutting mat. Not an item I’ll use so much, but still really useful to have. And it gives some rigidity to the pouch.
And it’s still roughly the same size as the old pouch, probably even a bit smaller.
Mounted on the Messenge’mups. Not an ideal arrangement, but it works.


