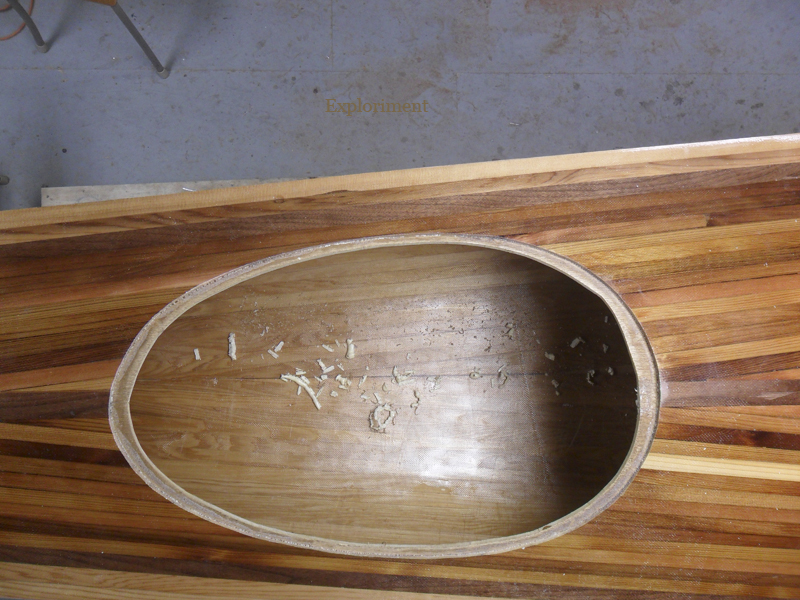
Cutting out the cockpit, hatches, and adding the cockpit combing.
I guess there are a number of ways we could have tackled the cockpit and the combing, but we decided to use all the little scraps of wood we had left over.

With a marker we drew out where the cockpit was, covered that with plastic to avoid the glue sticking to the deck, and replaced the shockcord.

Gorilla Glued the pieces in place, taped them and held them in place with the shockcord.


This only shows one layer, but we built up two layers of cedar strips. Since the glue was good only to hold it in place, we also fiberglassed and epoxied this for strength.


There were a number of ways to go about cutting out the cockpit, and we decided to try the plunge router we had sitting around. Since we knew there would have to be some shaping, and since the shape of the hole wasn’t super critical, it worked okay.


If we’d gone to the trouble to completely finish the strips off, I might have gotten a servicable riot shield out of it, but instead I ended up with a hunk of scrap.
After this we did a not too scientific weigh of it, and it came out to around 50 to 55 lbs. Which given the cockpit combing to go on, bulkheads, seat, foot pegs and rub rail still to go on, means that KayakCrafts claim that it will come out to about 65 lbs seem quite accurate.
The other thing that struck us was that all the wood we handled at the start of this project, was much, much heavier than 50ish pounds. Remarkable how much weight disappeared as saw dust, planer chips, spokeshave curls and sander dust.

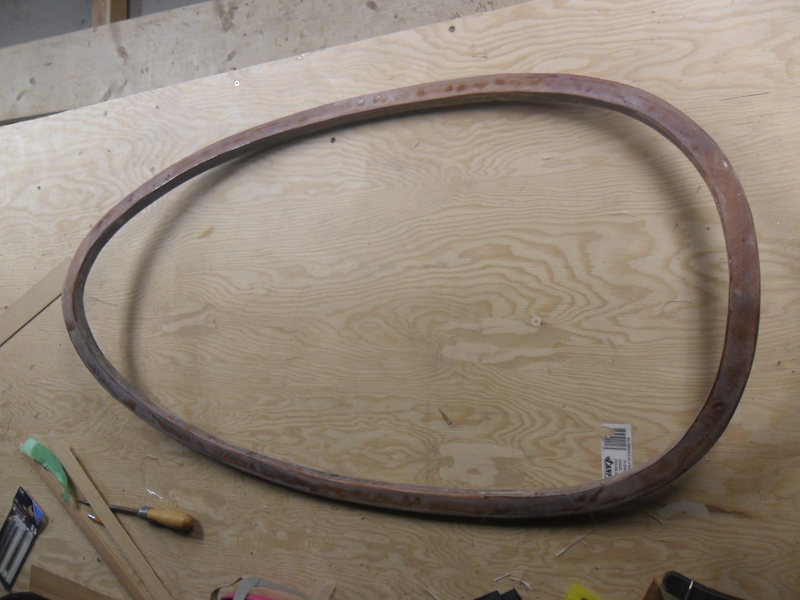
The combing, with the centre cut out, and the outsides roughly shaped.


The combing clamped in place to allow the two elements to be sanded and shaped so they were more or less perfectly matched.

And the outside of the combing shaped.
The lip on the combing is another thing that could have been tackled in a few different ways.


We opted to use some mahogany that we found in the rafters and planed very thin. This was the first layer. (While wood dust of any kind isn’t so fun, the instant we started planing and sanding this stuff, there was an almost instant bitter taste in my mouth, even with a dust mask on. Freaky.)


The second layer. All clamps on deck!

A view without all the clamps.
Now came cutting out the two hatches. The cockpit was a little less hairy, because I knew we had little more leeway. On the hatches however, I knew I only had one shot. I also wanted the thinnest kerf possible.


What I opted to use. I had originally contemplated a Japanese key hole saw, but still felt the kerf would have been too thick. An X-Acto handle and a junior hacksaw blade with the pin popped out of the ends is what I ended up using. With a handdrill and a bit about as thick as the blade, I painstakingly drilled a row of holes, just enough to work the blade in.

Some deep breaths.....and begin. I put down tape to mark where the hole was, because shitty Sharpie markers just wipe off with the slightest contact.


Took me about an hour to do a hatch.

Almost there.....

Through. Very happy with the results. Perfect cuts.


I sort of knew it would, but I wanted to see if my beloved Kifaru pack frame would fit through the hatches. And indeed they do. Given the direction my hole packing system is moving towards, I wanted to have the option of carrying this if I wanted to. I can see instances where this will not be carried, but I like having the option.

Next step was adding some lips under the hatches. A scrap of marine plywood Hank had kicking around was used for this. Cut to shape, not perfect, but close enough.


The forest of clamps once again. I’m about to scrounge up a few more clamps to fill in the empty spots

The Gorilla Glue (made from the essence of pure gorilla) foaming up.


The other hatch and the kooky number of clamps needed to bend the wood and hold it in place.
Without the clamps and the scraped off Gorilla Glue littering the bottom.

And with a coat or two of epoxy.

Tomorrow the cockpit combing goes on.
Didn’t get any pics between strips of unfinished mahogany and now, but here it is shaped and sanded, fiberglassed and epoxied. The nutty thing is that this took about as much time as the deck itself. We’ll do it differently next time, but there were several approaches we could take to do this, we tried one, and ultimately it did work.


Clampage.


And with the clamps off.


Then we added small pieces of mahogany around the inside of the cockpit combing. We had originally planned to put some thin, long strips of cedar around the inside horizontally, but that didn’t work out. Then we opted for this approach, which did work. Partly this was as a cosmetic thing, (not really necessary) but largely for some added strength.

After that we flipped the hull over to sand the bottoms of those pieces smooth and epoxying the bottoms of the hatch lips, and smearing a bit of epoxy in some other spots that needed it.
Go here for part 14 of the build: taking her out for a test spin.


All that clamping looks like something out of "Hellraiser"...coming along, um, swimmingly!
ReplyDeleteYes, because I intend to be an explorer in the further regions of experience.
DeleteThomas--that is fan-freaking-tastic!! I need to get me some of that Gorilla Glue. And about 200 clamps!
ReplyDelete200 clamps might be a bit excessive. 175 ought to suffice. I can't tell anyone escatly how many they should get to do something like this, but dozens. 50 at least, 20 or 30 more would be even better.
DeleteThe funny thing is that we have likely a dozen and a half, two dozen different styles and makes of clamps, and the ones that ended up being the best were these ones we got for cheap at a place up here called Princess Auto. 3 small ones and 2 larger ones. We didn't think they would amount to much, but given they were cheap we grabbed some to try. They ended up being the best of the lot. Went back and got a bunch more.
And you need more than just Gorilla Glue. We did all the holding together of the wood with their wood glue, and more critical gluing with their dark coloured stuff. Works very well, but wear gloves! The shit stains and takes days to wash off.